Welcome to our step-by-step guide on setting up ChemApp for Python and converting equilibrium files into Python-compatible formats! In this blog post, we’ll walk you through the process by our video tutorial, ensuring you have all the information you need to get started with ChemApp for Python and make the most out of it.
Setup and Install ChemApp for Python
- Step 1: Anaconda Installation
The first step is to download and install Anaconda from the official Anaconda website. Anaconda is a powerful tool for managing Python packages and environments, making it an essential component for our ChemApp for Python setup.
- Step 2: Creating a new conda environment
Using the command prompt, create a new environment by running the conda create command.
Specify the environment name (e.g. CAforFactSage) and the Python version compatible with ChemApp for Python (e.g., Python 3.11.3) and activate the environment. You can verify the setup by checking Anaconda Navigator, where your new environment should be listed.
> conda create -n CAforFactSage python=3.11.3
- Step 3: Downloading and Installing ChemApp for Python
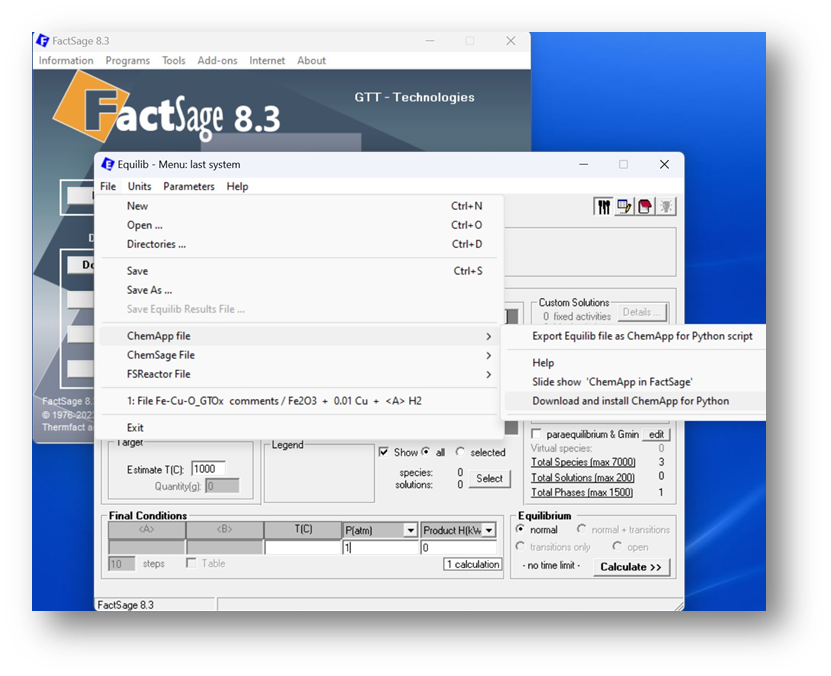
Using the FactSage software, open the Equilib module and navigate to “Files.” Choose “ChemApp file” and select “Download and install ChemApp for Python.” If it’s your first time, you may need to install the “.NET desktop runtime”.

Figure 1 – ChemApp-related options in FactSage 8.3 Equilib Module
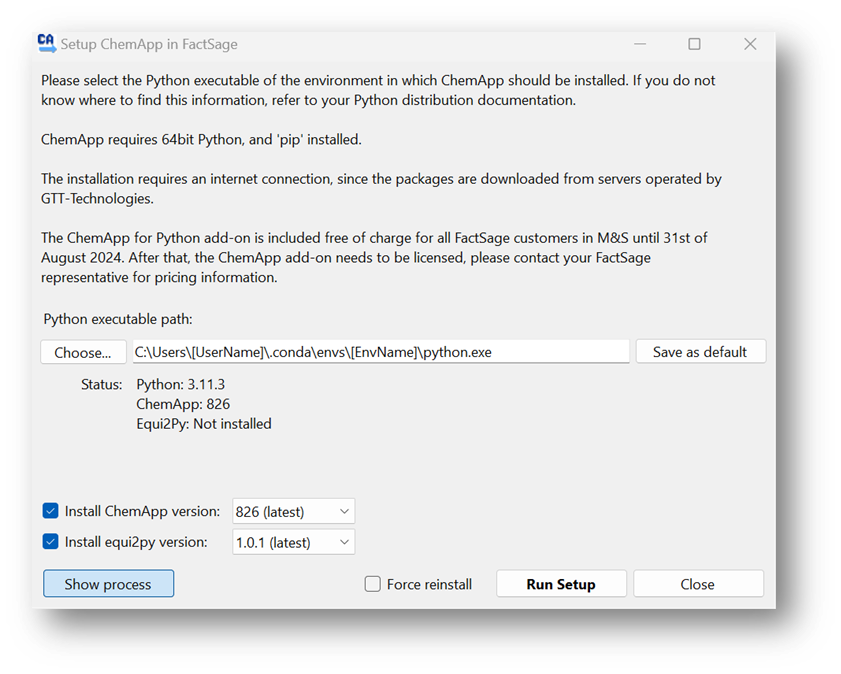
At the beginning of the ChemApp installation process, you’ll need to select a Python interpreter from your newly created environment. Select the python.exe that of your newly created environment located under C:\Users\UserName\anaconda3\envs\CAforFactSage\python.exe (or similar).
Make sure to install the latest versions of both ChemApp for Python and Equi2py. Once the installation is complete, you’ll receive a confirmation message.

Figure 2 – Setup ChemApp in FactSage
Convert “.equi“ files to “.py” pr “.ipynb” formats using Equi2Py
- Step 4: Converting Equilibrium Files
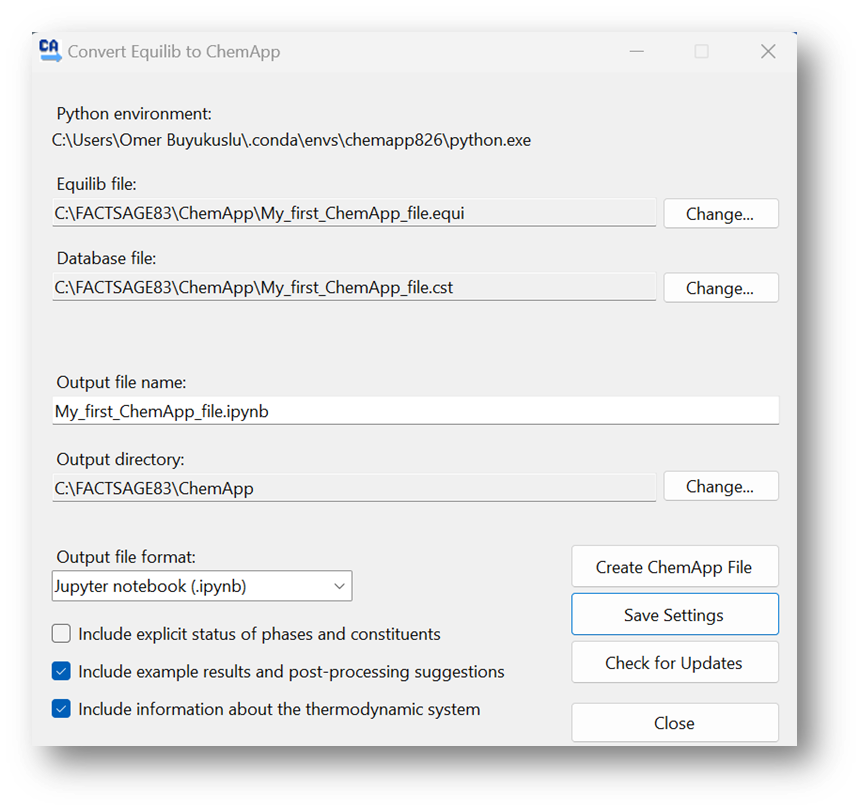
This is the easiest way to get started. With ChemApp for Python installed, you can now export Equilib input from FactSage. In Equilib, navigate to “File,” then “ChemApp file,” and choose “Export Equilib file as ChemApp for Python script.” Customize the filename and include phase and constituent details if needed. Save the settings and create the ChemApp file, which will be saved in the ChemApp directory within the FactSage folder. You have the option to choose different output formats for your equilibrium files, such as .ipynb or .py.

Figure 3 – Equi2Py: Convert Equilib to ChemApp for Python script
Three files are generated as an output of this conversion and stored in a dedicated folder of your choice.
– Factsage Equilib file in .equi format
– Thermochemical database file in .cst format
– Generated .py (Python script) or .ipynb (Jupyter Notebook) file
- Step 5: Exploring Your Python Files
The Python script generated by Equi2Py is specific to the material system that is created in the Equilib Module. The Python script is self-explanatory, making it easy to become familiar with ChemApp for Python and manipulate the script, even with a limited amount of Python knowledge. You can obtain the results of the thermochemical equilibrium calculations by running this script, and they can be saved in various output formats. We recommend using an Integrated Development Environment (IDE) like PyCharm or Visual Studio Code for writing, testing, and debugging your ChemApp for Python scripts efficiently.
Congratulations! You’ve successfully set up ChemApp for Python and learned how to convert FactSage-formatted equilibrium files into Python-compatible formats. We hope this guide has been helpful in simplifying the process and make use of Equi2Py for your next ChemApp for Python project!
For more information on ChemApp for Python, check out the documentation and the “ChemApp in FactSage – What’s new?” page.
